WhatsApp Business ChatbotHow to Use WhatsApp Business Chatbot for CRM?
- WhatsApp Business chatbot for CRM is Automated tools along with manual send/receive message to WhatsApp Business contact from vTiger.
Step by Step Guide,
- How to set up a WhatsApp Business Chatbot?
- How to create a Chatbot button?
- How to use WhatsApp Business bot template?
- How to Build/Design Flow for WhatsApp Business ChatBot?
- Convert Chat to Manual / Robotic Mode
- How does WhatsApp Business Chatbot work?
How to set up a WhatsApp Business Chatbot?
- Go To WhatsApp Business Chatbot interface: by clicking on the “Chatbot” icon:

- Go to create a new Chat bot by clicking on the “Add New Bot” button.

- Users can edit, duplicate and delete WhatsApp Business Bot by clicking on related icons.
- Users can view the chat for that flow by clicking on the Chat log according to Bot ID.
- Chats display the total numbers of the message conversations for that bot from different numbers.
- Users can see the modified date and time of the conversation for the flow which is displayed in the Date of conversation column.
 Search in WhatsApp Business Bot Listing
- Users can search Bot from List of Bot by entering Bot name.
 How to create a Chatbot button?
- Users can design a WhatsApp Business Chat button to place on your website integrated with the WhatsApp Business Chat Bot.

- Users can create a Chatbot button for their website by clicking on the WhatsApp Business Bot Settings icon > WhatsApp Business chat Button > WhatsApp Business Bot Button Setting.
- Users have to fill in all the required details to design the Chatbot button and select the connected number and save it.
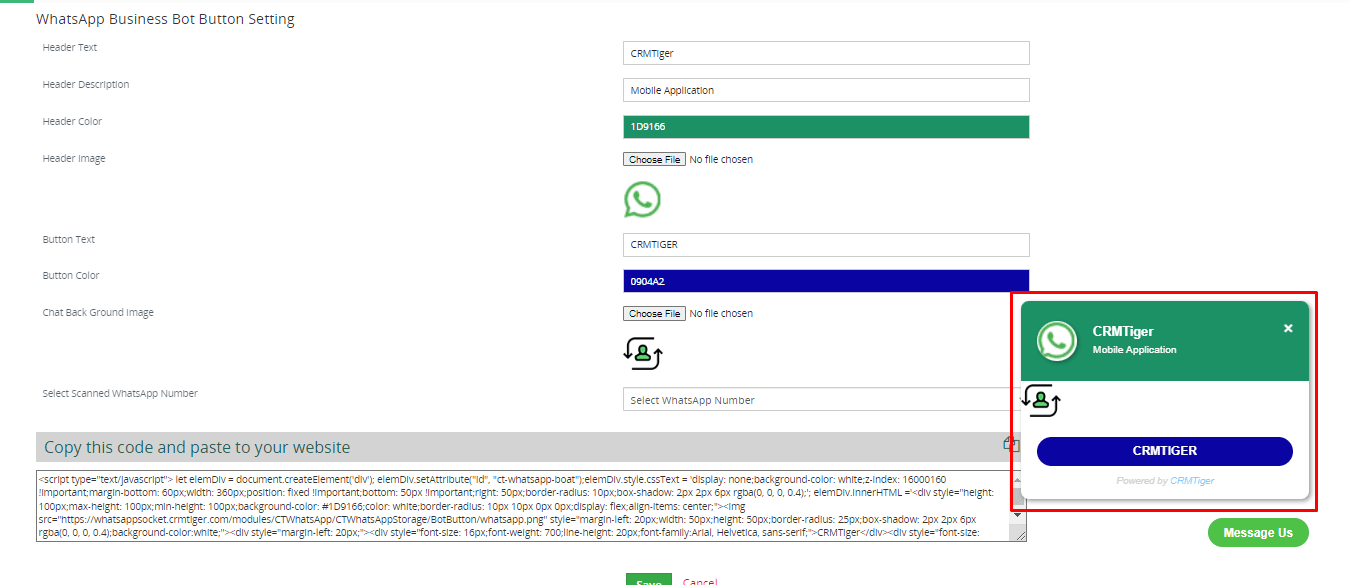
- After that users have to copy that script and paste it to their website where this Chatbot button is required to display.
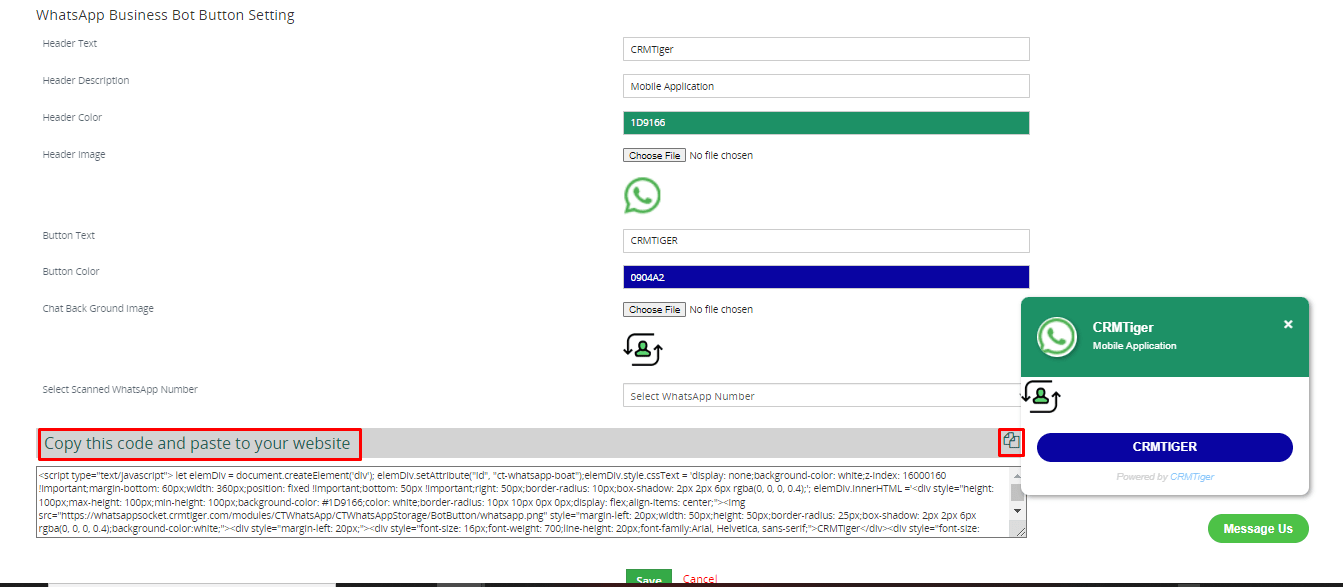
- Users can activate or in-active WhatsApp Business Bot by clicking the ON/OFF button accordingly.
- Users can also sort Bot Names alphabetically.
 How to Use the WhatsApp Business Bot Pre-Defined Template?
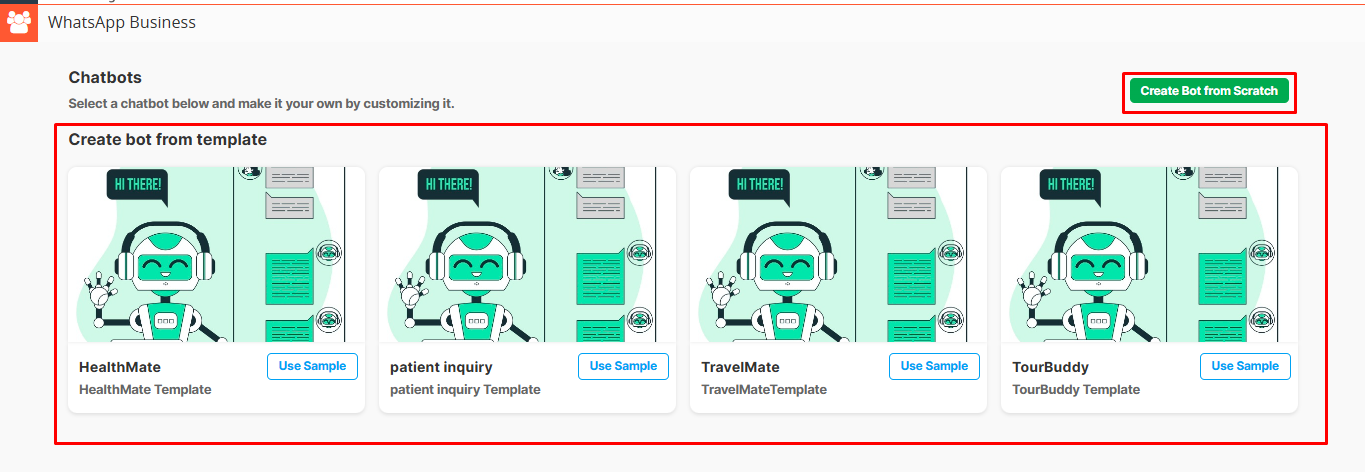
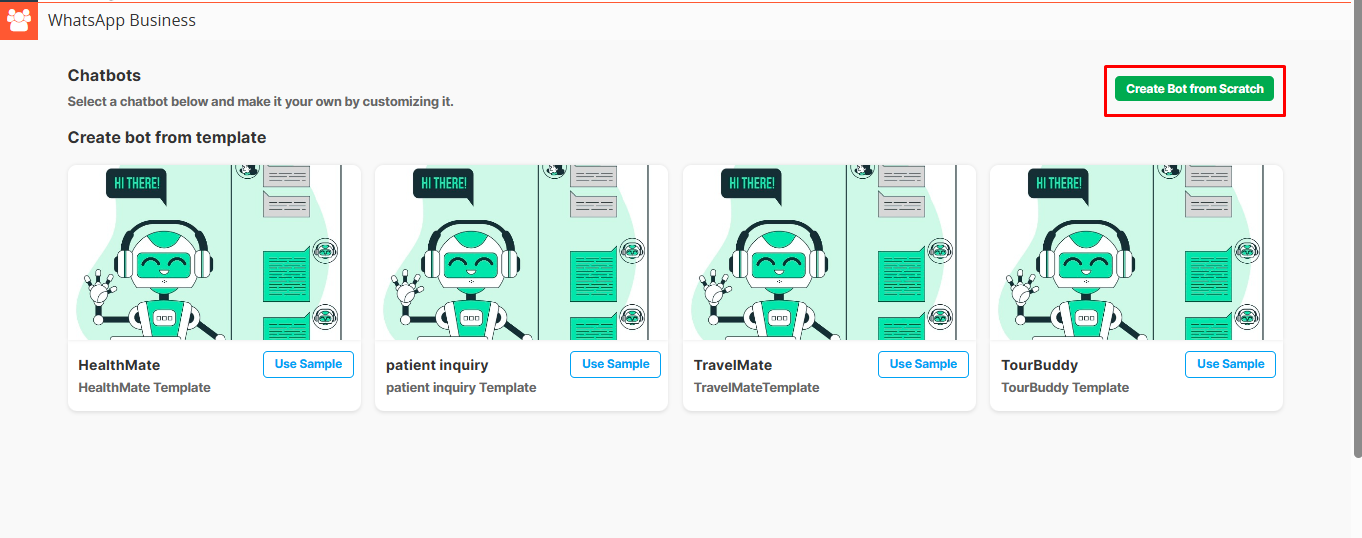
- Users can use template from the created bot by clicking on the “Add New Bot” button, and selecting available template.
- You can use predefined templates offered by the CRMTiger team for WhatsApp. You’ve 2 options: either Create Bot from Scratch by click on ‘Create Bot from Scratch’ button or Select template for available WhatsApp Business Bot by click on ‘Use sample’.
 How to Build/Design Flow for WhatsApp Business Chatbot?
- Users can set the flow according to the requirement for the Bot.

- Assign Bot to User with Connected WhatsApp Number
- The “Assigned To” dropdown shows a list of users configured from the WhatsApp Business settings.
- When a user is selected from the “Assigned To” dropdown, their connected WhatsApp number will appear in the “Select Number for Bot” dropdown.
- Only users who have WhatsApp numbers configured in the WhatsApp Business settings will appear in the dropdown.
- You can assign a bot to any user, even if you are logged in as another user.
- This allows flexibility in assigning bots across users, as long as the target user and their number are already configured.
- After selecting the user and their number, you can enter the bot name and click the “Save” button to complete the assignment.

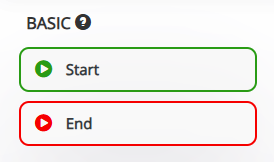
- Start: Use this node when you start designing the Bot flow.
- End: Use this node when you end designing the Bot flow.
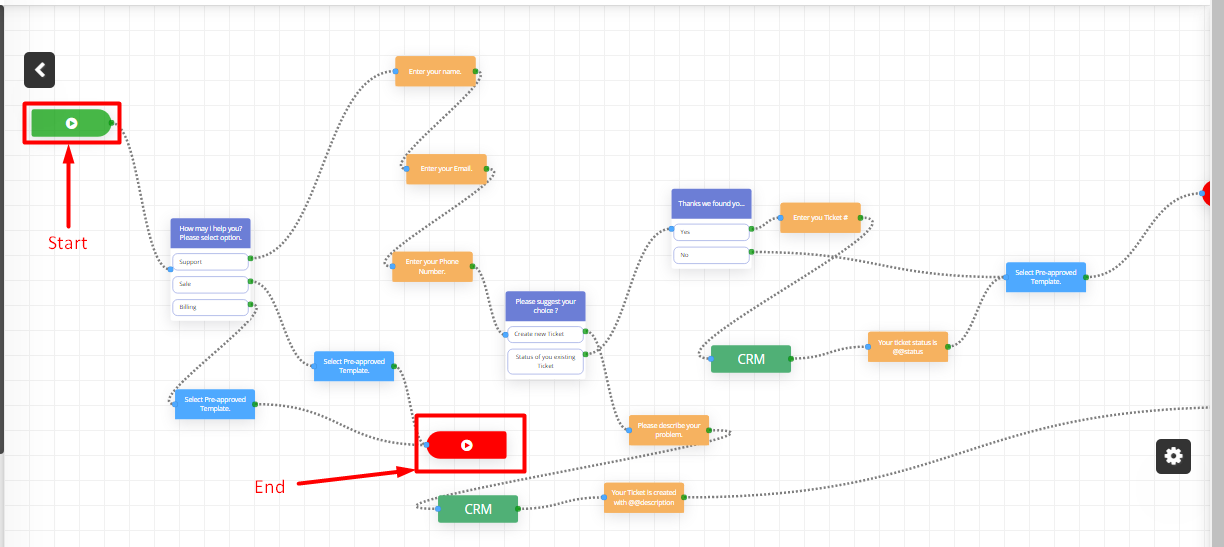
- To add keywords, the user must click on the Start Node Edit icon.
- Keywords are used to initiate a bot automatically.
- Users can run multiple bots simultaneously, each triggered by specific keywords.
- Multiple keywords can be added for a single bot by separating them with commas. for example: Hi Travel, Hello Trip, Start Journey

- When a customer sends the message “Hi Travel”, the Travel Bot will be initiated.
- When a customer sends “Hi Healthcare”, the Healthcare Bot will be triggered.
- This allows different bots to respond based on the message received, enabling topic-specific automation.

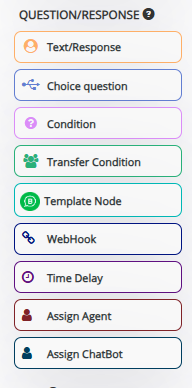
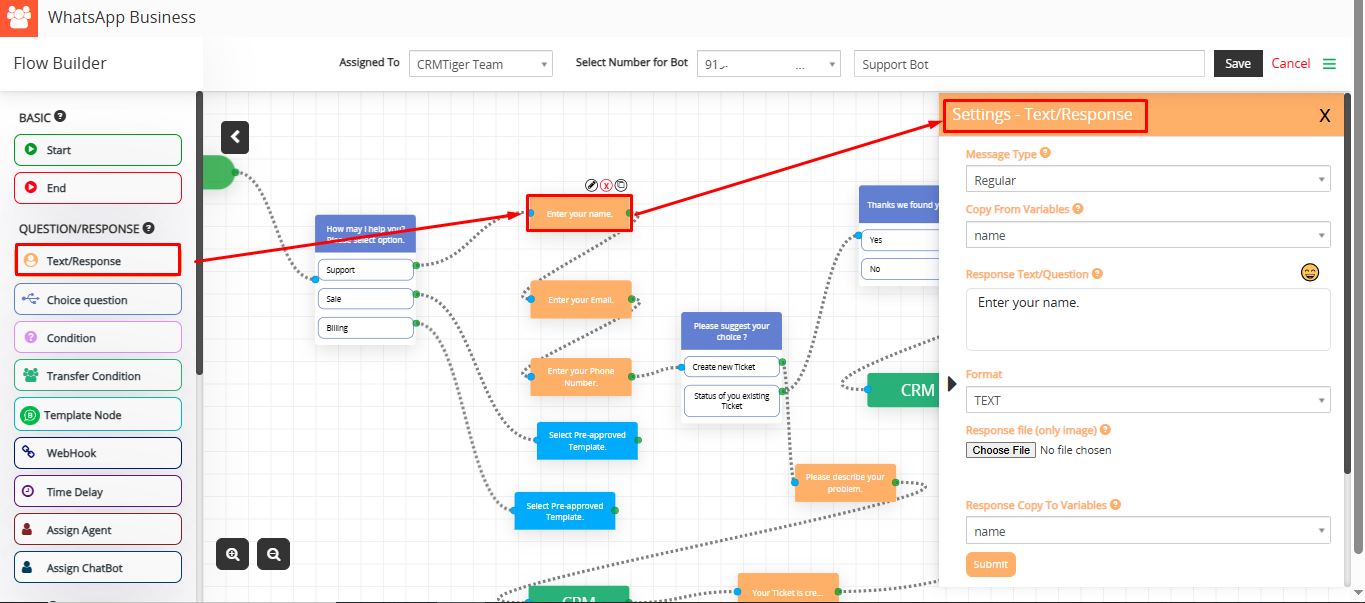
- With this feature, users can set various types of questions in flow to Ask customers.
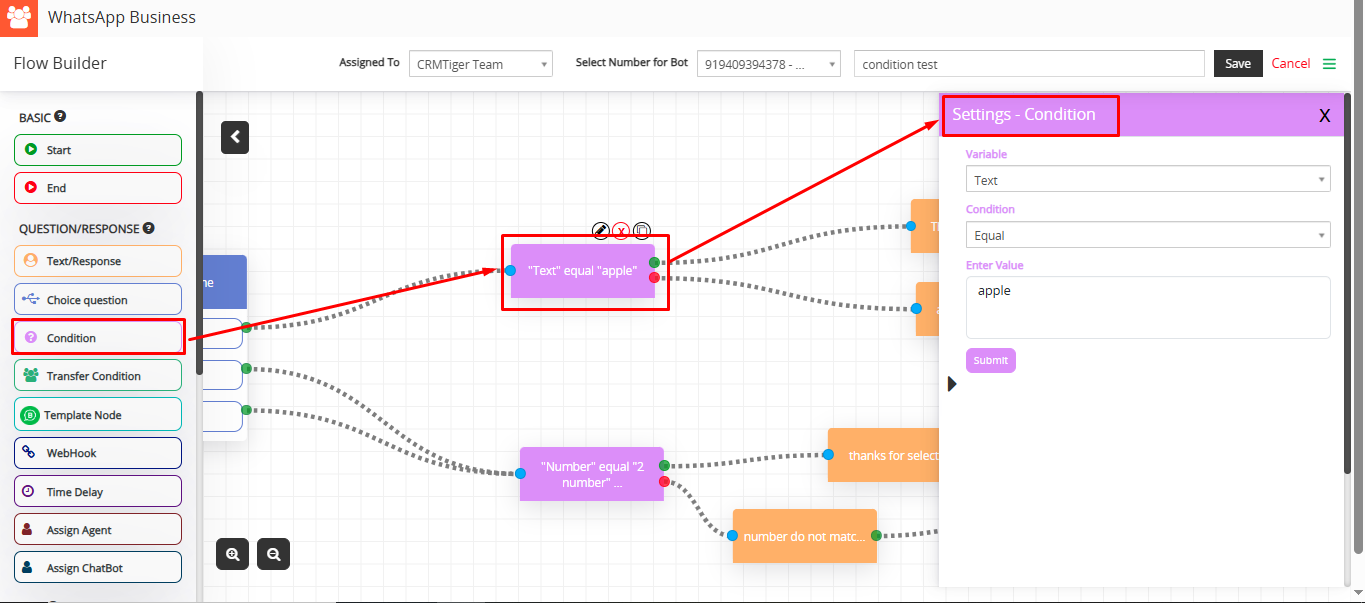
- Add Condition to check it against a response from a customer in Bot.
- Regular message – This is a regular message type format sent to customers from Bot.
- WhatsApp Business Response – This message type will display responses to customers in WhatsApp format.
- Copy from Variables: Select variable to add or copy to the message which converts to actual value when sent message to customer.
- Response Text/Question: Type a message as a response or ask a question to the customer.
- Format: Select any format like text, number, email and date for response.
- Response file: Send Image as response to the customer along with text.
- Response copy to variable: Copy customer answer of question from bot to variable which can be used to store in CRM or reply to customer on various stages of Bot flow.
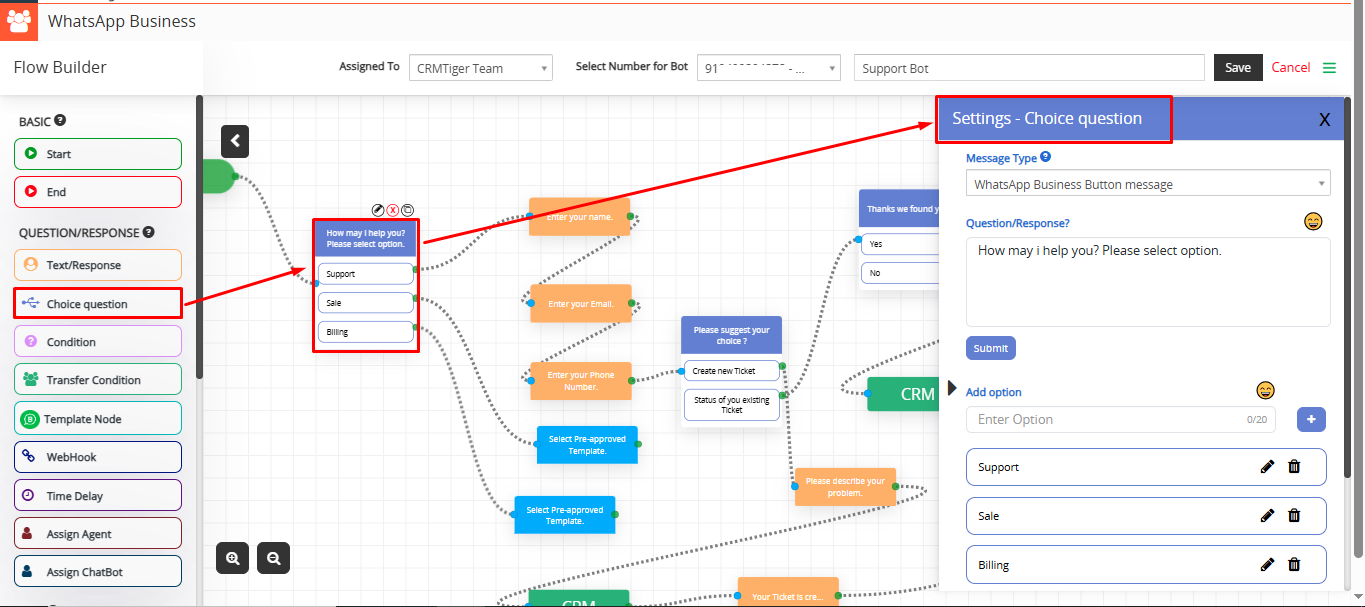
- Choice question allows the user to choose from multiple predefined options during a conversation with the chatbot. This helps guide the user through different chatbot flows (e.g., Support, Sales, etc.), making the experience faster and more relevant.
- Choice Question Settings:
- Message Type
- Regular message – This message type will display responses to customers in WhatsApp Regular format.
- WhatsApp Business Button message – This message type adds interactive buttons (up to 3, with a text limit of 20 characters per button) to a message, offering pre-defined actions that make user interaction smoother.
- WhatsApp Business List Message: This message type presents a dropdown menu with up to 10 selectable options, organized under headers for better clarity. It’s perfect for scenarios where more than three options need to be displayed, allowing users to easily browse and select their choice from a clear and organized list. Simply tap the dropdown to view the options and make your selection.
- Question/Response: Add a question for the flow according to your choice.
- Add Option: Add an option for the question according to your choice.
- Variable: Select a variable like number, email, date or description for the value.
- Condition: Select the condition for the question like a value equal to Apple etc.
- Enter Value: Value: Enter value according to variable type selected.
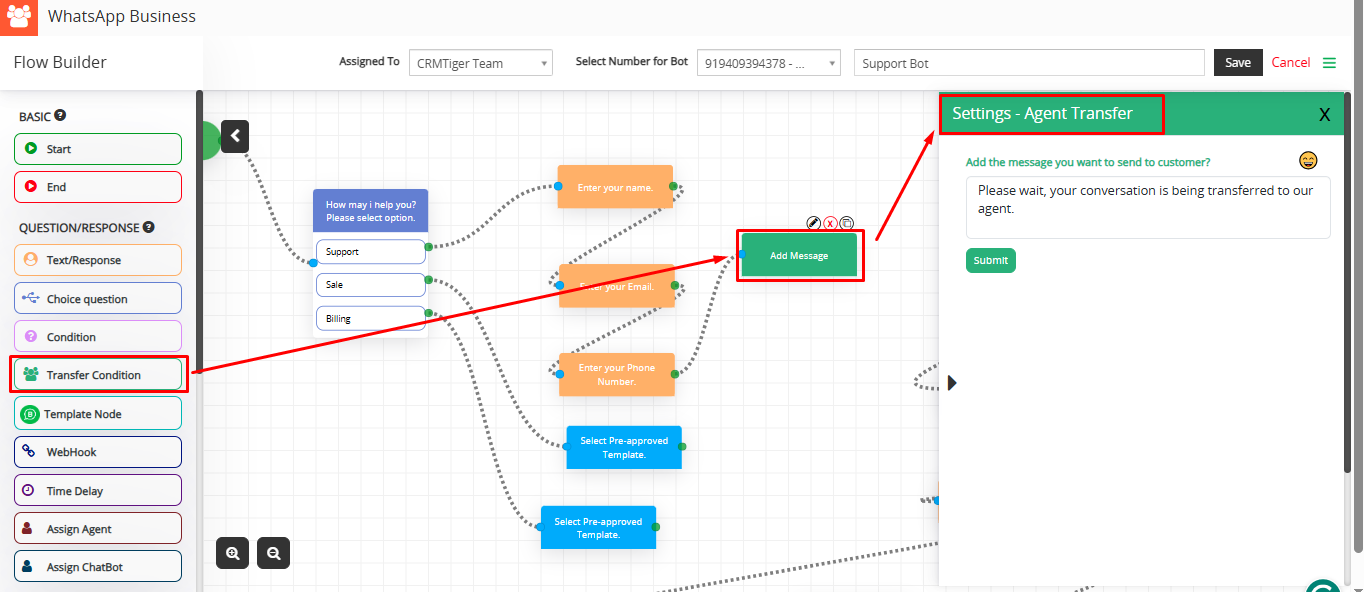
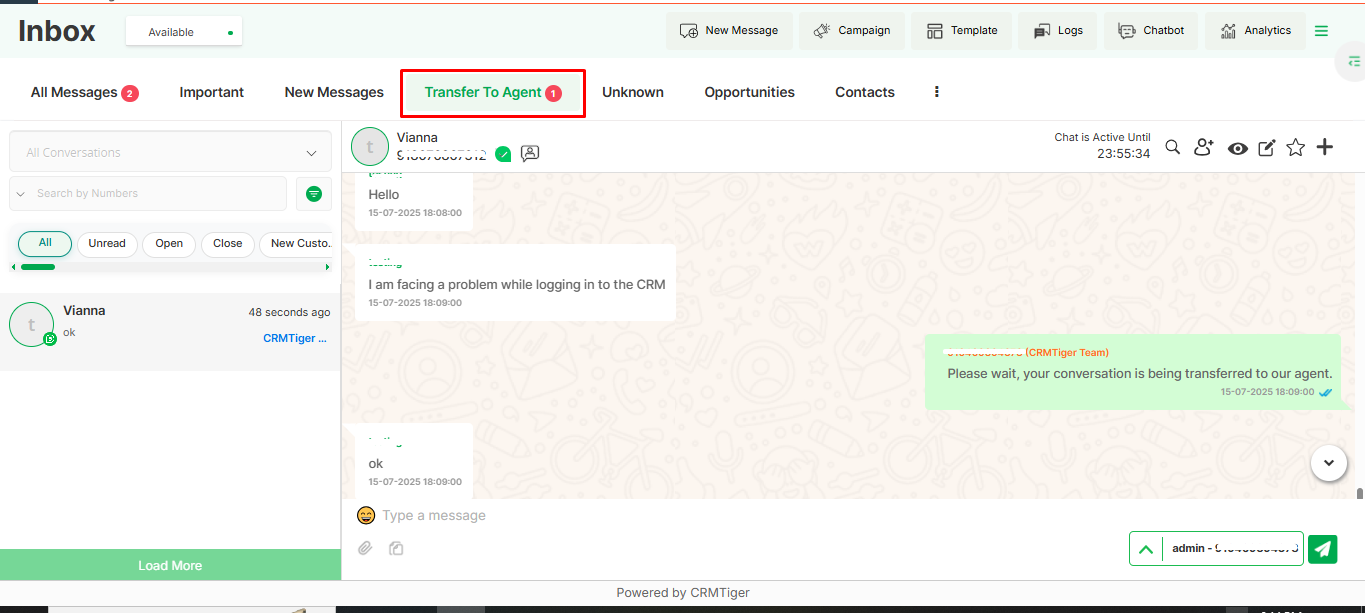
- Add the message you want to send to customer: You can enter the message that will be displayed to the customer while the bot transfers the conversation to a live agent. — For example: “Please wait, your conversation is being transferred to our agent.”
- Connects the bot to an external system or API.
- Sends data and fetches responses dynamically (e.g., from your CRM or backend).
- Ideal for advanced workflows like checking order status or fetching user data.
- WebHook URL: This is the endpoint that your bot will call when this node is executed. It can be used to send or retrieve data from external systems.
- How to use:
- Enter a valid URL such as https://yourdomain.com/api/webhook.
- Make sure the endpoint supports the selected API type (GET or POST)
- If you are using variables, you can set them below in the Set Variables section.
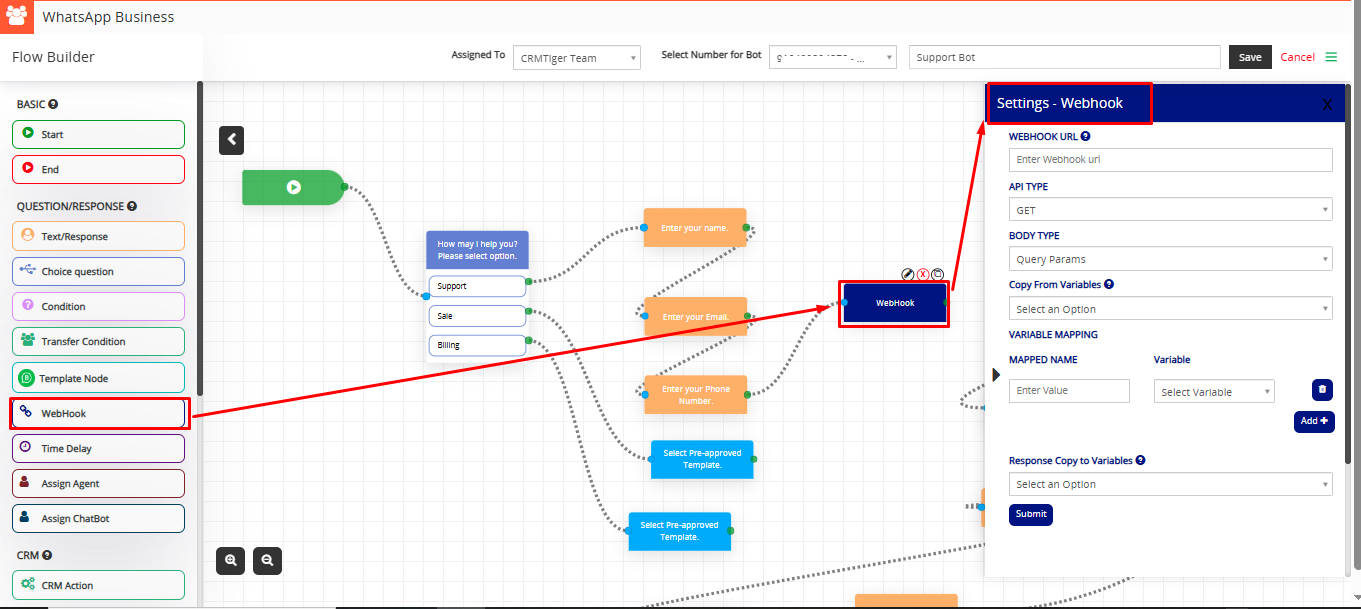
- Note : Ensure your endpoint is accessible publicly or within the server’s network if it’s internal.
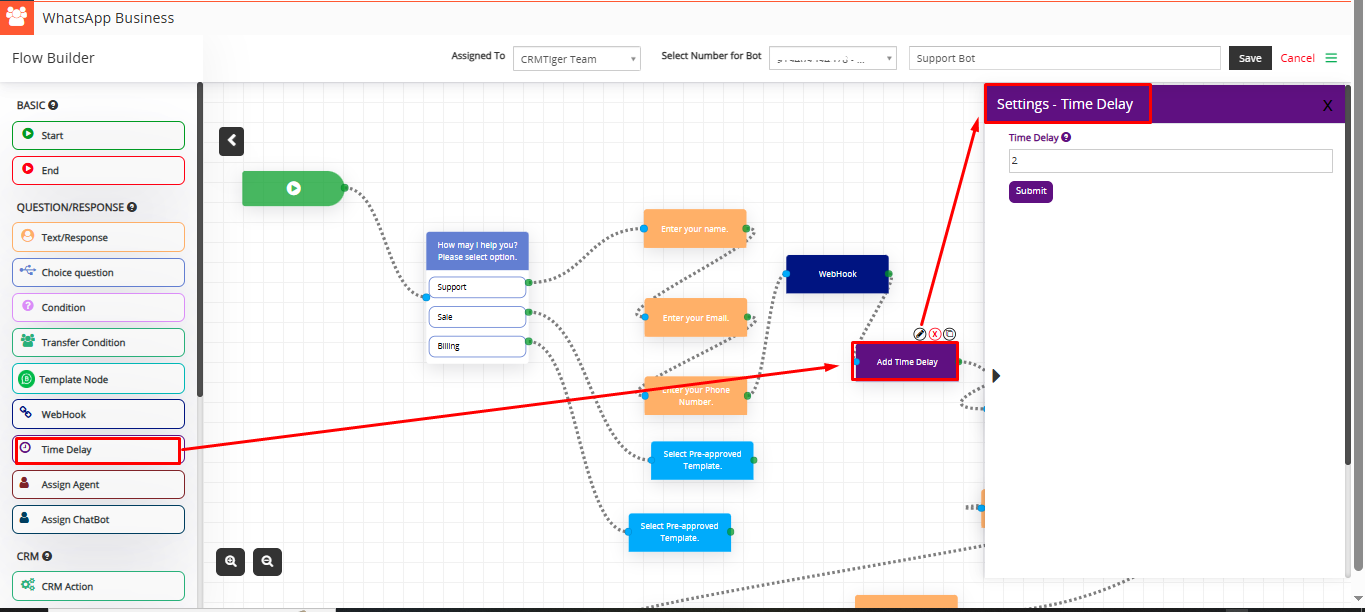
- Adds a pause between messages.
- Simulates human-like conversation or creates space between messages for better UX.
- Example: Delay of 2 seconds before sending the next message.
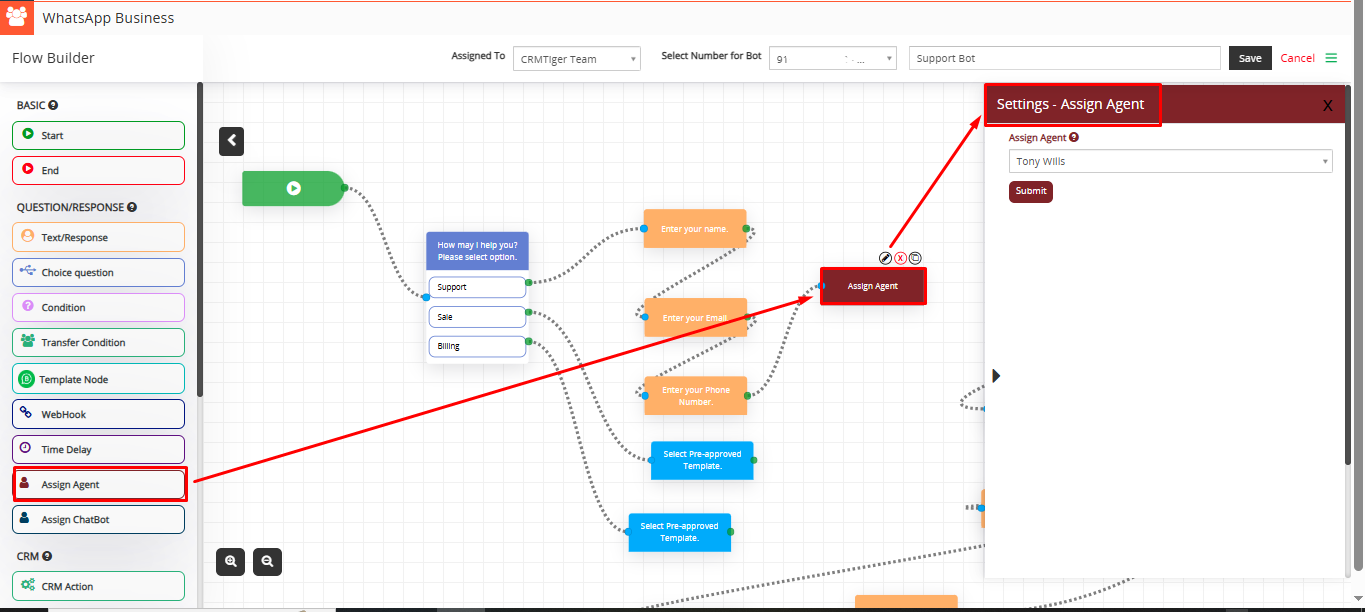
- This feature allows the system to assign a specific agent to handle the conversation when the bot reaches this node.
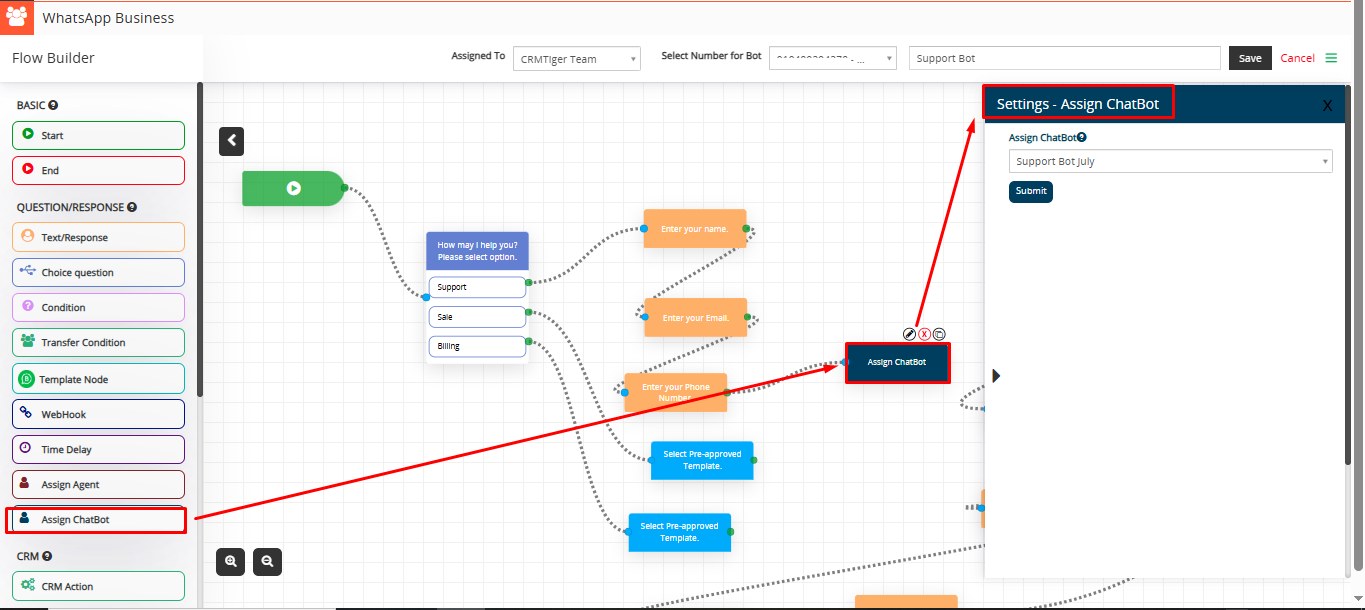
- Routes the conversation to another chatbot.
- Useful for managing multiple bot flows across departments or topics.

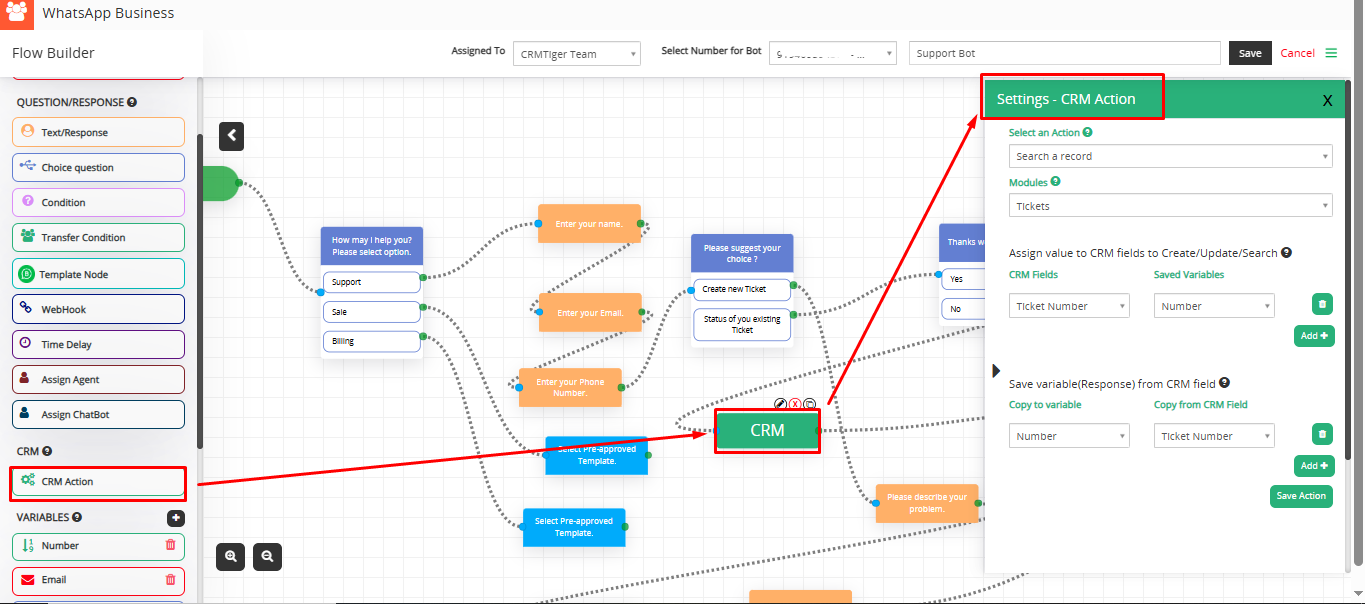
- Select an Action: Select an Action should allow the user to select various operations on CRM.
- Create a Record – It allows you to Create records in CRM from responses from the customers.
- Search a Record – It allows you to search records from CRM from the value pass to CRM field.
- Update Record – It allows you to search and update records from CRM from the value pass to CRM field.
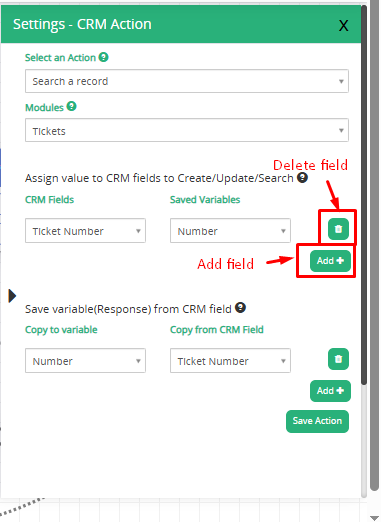
- CRM field – Select CRM fields to copy value to CRM fields from available variables in create action
- Saved variables – Select available variables used to store customer’s input from chatbot’s questions.
- CRM field – Select CRM fields to copy value to CRM fields from available variables in update action.
- Saved variables – Select available variables used to store customer’s input from chatbot’s questions.
- Default Value: Users can add a default value to be stored in the CRM field if needed.
- Copy to variable – Select variable type as name, email, date or description for copy variable.
- Copy from vTiger Field – Select fields for copying variables from vTiger field.

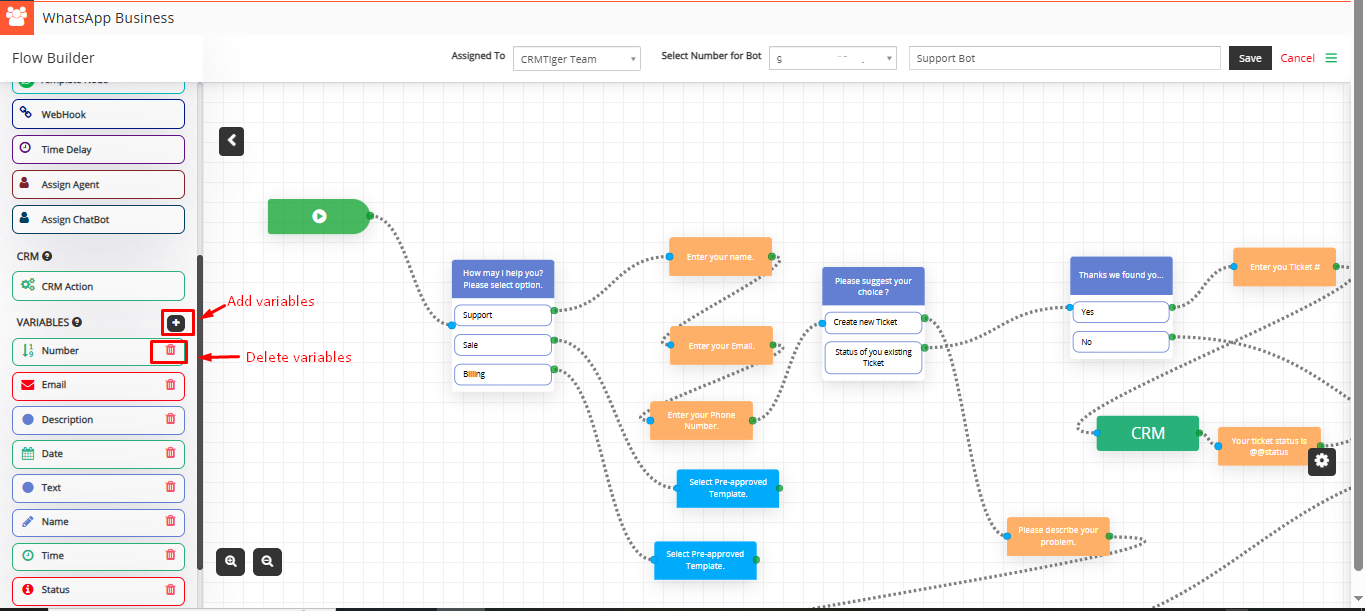
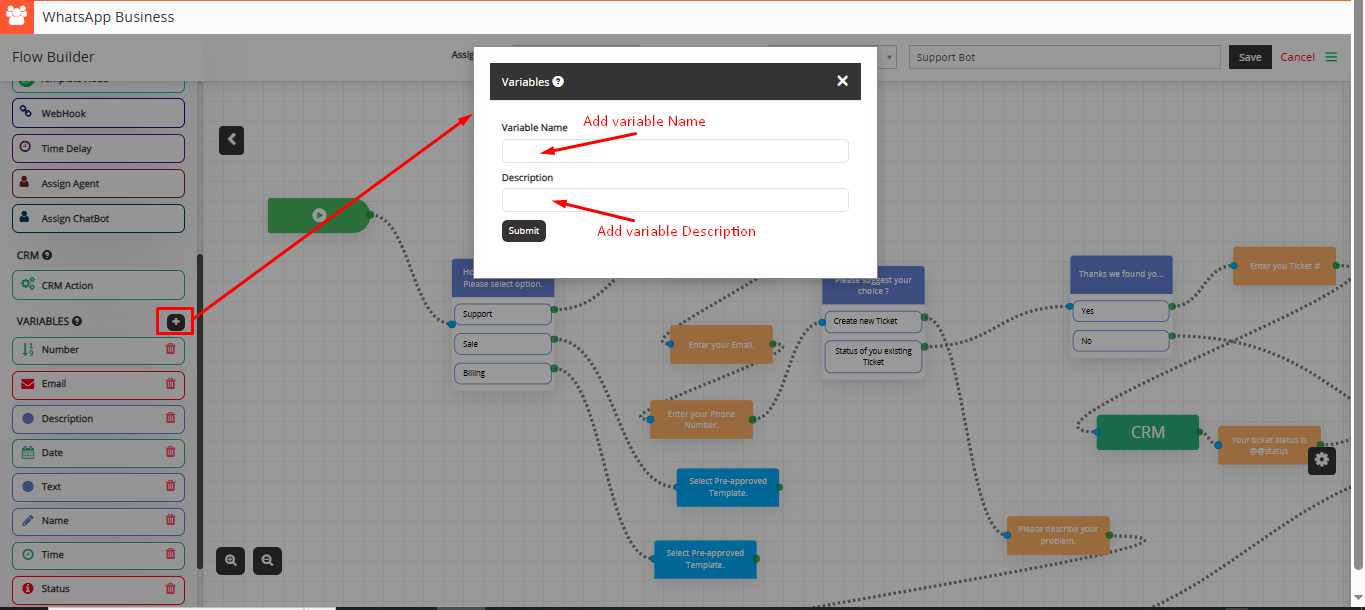
- Add Variable Pop-up
- Variable Name: Enter name for Variable
- Description: Enter Description for Variable
- The phone number variable is a default system variable that automatically captures the user’s number from the conversation. Users do not need to manually save the phone number to the CRM.

- Users can Clear all the added actions by clicking on the Clear option and also duplicate the created Bot from the Flow Builder.
- Users can also zoom in and zoom out of the created chatbot flow.
 Steps to Configure the Bot:
- From the “Select Number for Bot” dropdown, choose the WhatsApp Business number that is connected and accessible to the user, based on the “Assigned To” setting.
- Provide a name for your bot that will help identify it easily.
- Begin designing the bot flow by adding a Start Node, which marks the beginning of the conversation.
- Build the conversation flow using components such as Question/Response, CRM Actions, and Variables to meet your business needs.
- Complete the flow by connecting it to an End Node to signify the end of the conversation or interaction.
- Click the “Save” button to save your bot configuration and ensure all changes are stored.


- Note: WhatsApp Business Bot will only be enabled for those users who have been connected to the selected WhatsApp Business numbers from Settings > WhatsApp Business configuration > Add / Delete users / groups to use multiple WhatsApp Business numbers
 Convert Chat to Manual / Robotic Mode
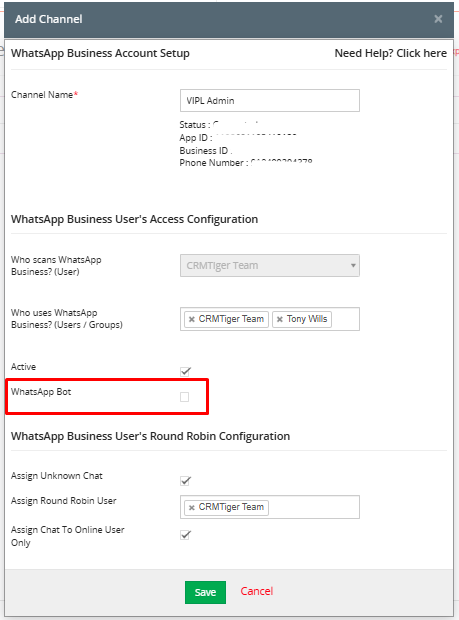
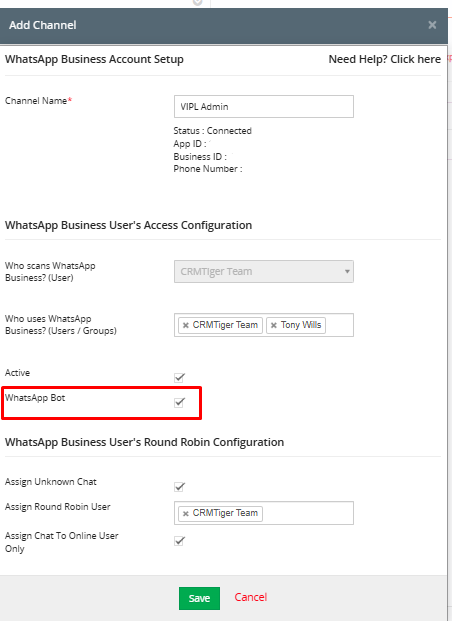
- Clicking on the on/off button will stop automatic conversation from the Bot to the selected customer number.

- If Whatsapp business chatbot is enable from the Whatsapp Business configuration > quick edit in the connected user or add WhatsApp business account
 How does WhatsApp Business Chatbot work?
- Support Bot Flow: Creating a Ticket for an Existing Contact
- How does the WhatsApp Business Chatbot for the Support team work ?
- Activate “Support Bot” to connect your WhatsApp Business Number.

- When you start messaging as “Any message”, Bot will auto-respond according to the flow.
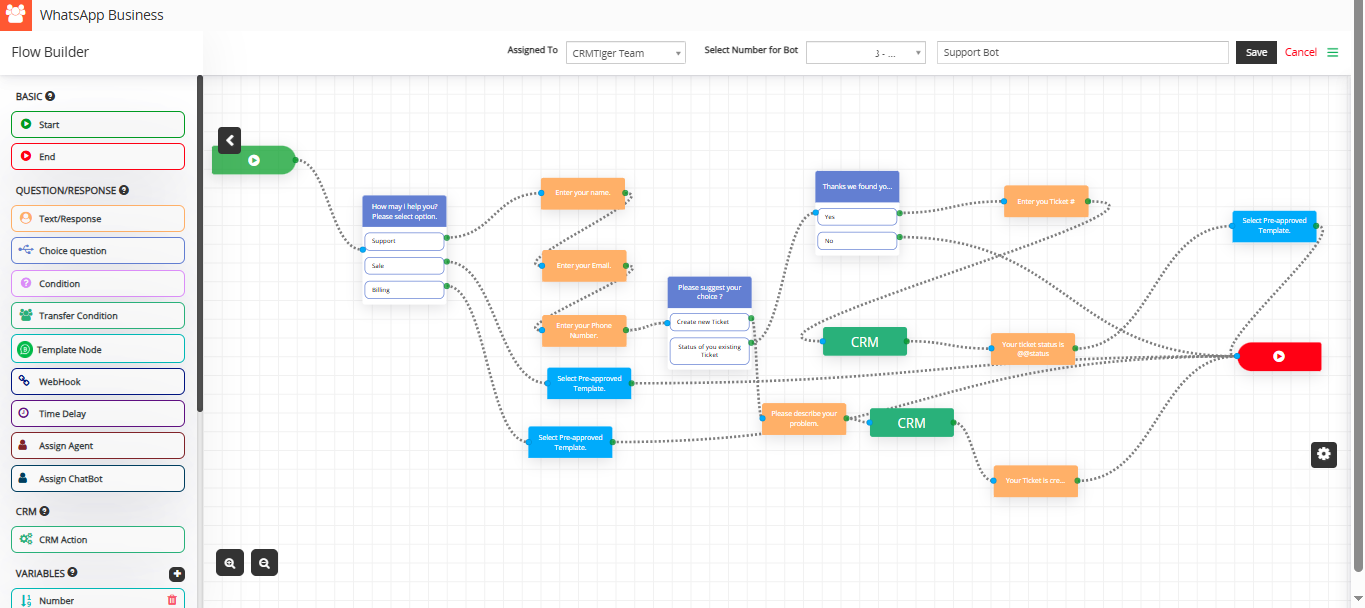
- Select the “Support” choice as its set flow for that.

- Enter Name, Email and Phone Number, that will create contact according to the details you entered detail as its set CRM Action in flow.

- Enter your choice “To create a new ticket” or “Status of existing ticket”.
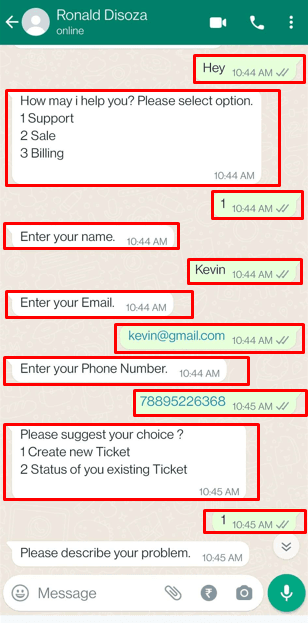
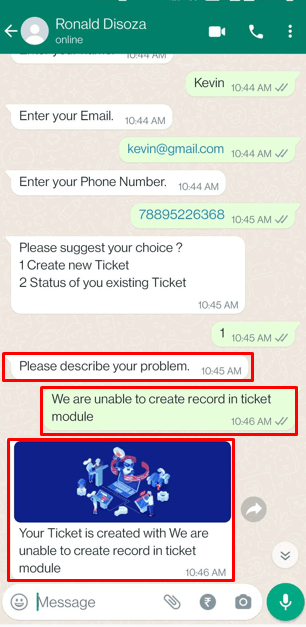
- If you select “Create New Ticket” by entering number as 1 will ask to describe your concern.
- It will create a ticket in CRM against your concern.

- OR If you select “Status of your existing Ticket” by enter number as 2 will ask you to enter the ticket number to show ticket status.


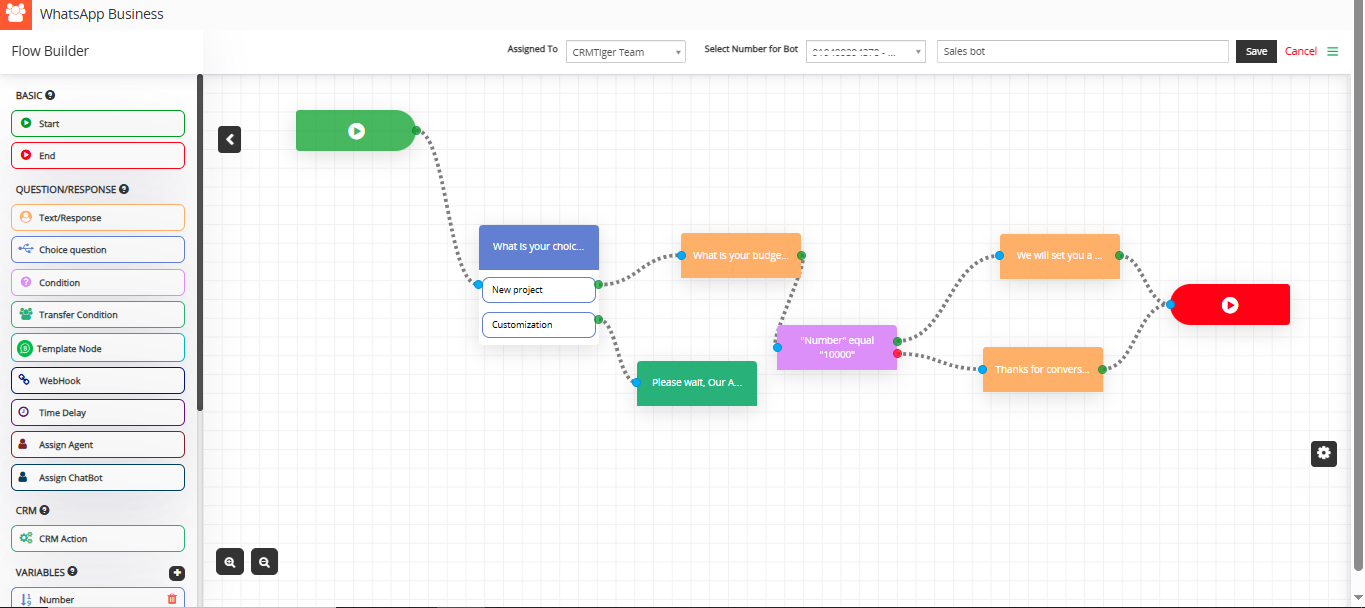
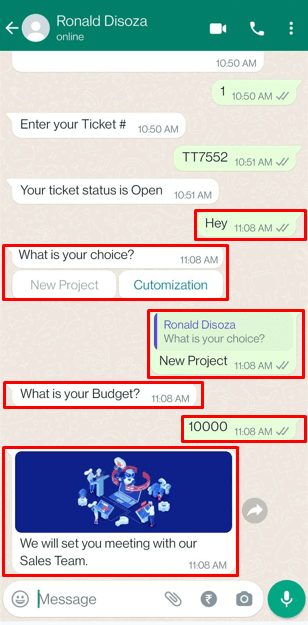
If you enter “10000”, the condition set as “Number equal to 10000”, will evaluate as true, and the bot will respond with:
“We will set up a meeting with our Sales Team.”
If you enter any value not equal to 10000, the condition will evaluate as false, and the bot will respond with:
“Ok, thanks. Our Sales Team will contact you soon.”
Interested to Try WhatsApp Business Integration ? Click Here
